


Your Mac computer is filled with important files you want to keep private or hidden. That’s why you may want to make sure no one has access to it. To do this, you may either hide the folder or put a password in it using Disk Utility. One thing you can also do is to password protect folder Mac without Disk Utility. So, you may be asking the question, if it’s possible to put a password on a Mac folder. How do I do it using Disk Utility? How to do it using Terminal?
Here, we will discuss how to password protect folder Mac without Disk Utility. We will also discuss how to do it with Disk Utility itself. Then, we talk about protecting ZIP files within your Mac computer using compression. These are just the tip of the iceberg. So, let’s start protecting the folder on your Mac computer!
Article GuidePart 1. Is It Possible to Put Password on a Folder Mac?Part 2. How Do I Lock A Folder on Mac without Disk Utility?Part 3. How to Password Protect Folder on Mac via Terminal?Part 4. Conclusion
Part 1. Is It Possible to Put Password on a Folder Mac?
So, is it possible to password protect folder Mac without Disk Utility or with it? The answer to the question is an astounding YES. It is possible to put a password on your Mac folder to make sure no one has access to it.
So, how is it done? First, you can do it with Disk Utility. You can also do it with tools other than Disk Utility. These include the Terminal, OpenSSL, Compression Using Archive Tools, and even through third-party software such as iMyMac PowerMyMac.
Part 2. How Do I Lock A Folder on Mac without Disk Utility?
How to password protect folder Mac without disk utility? Well, that’s actually simple. You can iMyMac PowerMyMac tool to do so. Actually, in this case, you’re hiding and encrypting your files easily through third-party software that’s very reliable. For this, we do recommend iMyMac and its PowerMyMac tool. This tool has a lot of modules including the ability to hide and encrypt files through its Toolkit. It helps you protect private information on your computer to ensure that it doesn’t get access by anybody who isn’t allowed to do so.
Here are the steps to password protect folder Mac without Disk Utility (but with iMyMac PowerMyMac):
Step 01. Download And Install iMyMac PowerMyMac
The first step is to download and then install iMyMac’s PowerMyMac tool. Grab the installation package on your computer. Then, open it to install the tool. After that, launch iMyMac PowerMyMac on your operating system.
Step 02. Go To Toolkit And Visit Hide
Once you launch PowerMyMac on your computer, you should go to the Toolkit portion at the top. This is found in the third tab. Choose Hide located inside the Toolkit.

Step 03. Set Password
The first time you enter this page, you should set a password and confirm it. In this way, this becomes a master password you can use to go through all your hidden and encrypted files.
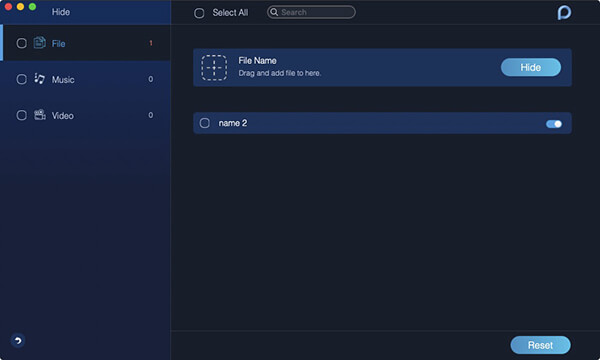
Step 04. Hide Your Folder Or File
Drag a file or folder within the screen and then drop it. You can drag multiple files or multiple folders as well. Then, click the Hide button to ensure that it is now encrypted. You are near the end of the process on how to password protect folder Mac without Disk Utility. It is important to note that there’s a switch button at the bottom. Turn this button off, the file you dragged will then be unhidden again.
Step 05. Encrypt The File Or Folder
Go back to the previous page. Then after that, type in the password that you have set earlier. Choose the Encrypt button located in the Hide And Encrypt. You can also drag a file and then press the “Encrypt” button.
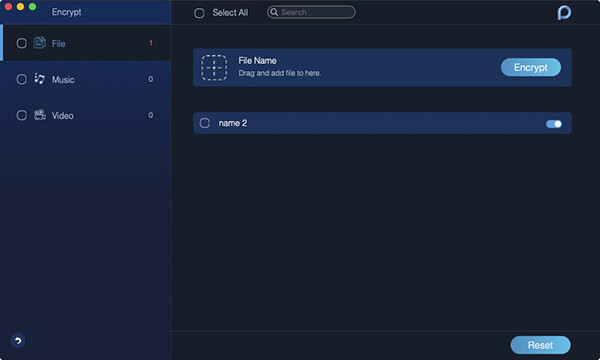
By this time, the file won’t be seen by others. However, you can view it anytime within the Encrypt page. You should remember that if the file is shown in the Hide list and isn’t hidden as of the moment, you cannot encrypt it. If you wish to encrypt it, you should remove the file first from the hide list. To do this, follow the steps below:
- Tick the specific file in the Hide list.
- Toggle the switch on located on the right side of the file.
- Press the button for Reset located at the bottom right side of the interface.
Now, you have finished how to manage and even password protect folder Mac without Disk Utility. We will go on to find out how to do it through Terminal. Check out the next section below.
Part 3. How to Password Protect Folder on Mac via Terminal?
There are ways to password protect folder Mac without Disk Utility but with Terminal. Check out our guide below.
Password Protect Folder on Mac Using OpenSSL
This is a method that can be done on Mac without using third-party tools. It involves a built-in Mac tool to protect your files and folders. It is important to use this tool if you wish to place new files on a particular encrypted folder in Mac. Check out the steps below on how to do it:
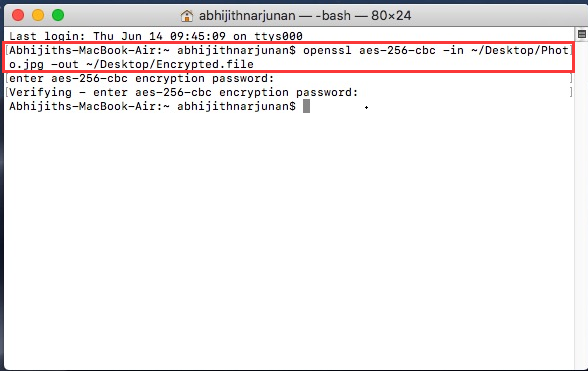
- Launch Terminal. The first thing you should do is to launch Terminal.
- Enter The Right Command. Enter the command without the quotes and the end period in it: “openssl aes-256-cbc -in ~/Desktop/Photo.jpg -out ~/Desktop/Encrypted.file”. Make sure that the part labeled ~/Desktop/Photo.jpgwill be replaced with the file that you wish to encrypt including its specific location. On the other hand, the part called jpg -out ~/Desktop/Encrypted.file will tell you the location where the actual encrypted file will be saved.
- Enter Command And Password. After that, you should enter the command and then put the password for encryption when you are prompted. Make sure you confirm the actual password in order to proceed to the next step.
- Use The Encrypted File. You will now have the ability to see its Encrypted.file within your Desktop. It depends on your own needs and preferences. However, you can also set the directory and its encryption methods.
Now, we have shown you how to password protect folder Mac without Disk Utility! In this case, we have used the Terminal and its OpenSSL built-in tool.
Password Protect Zip Files on Mac with Compression
Here, we will teach you how to password protect folder Mac without Disk Utility. In this case, we’re going for ZIP files that are actually archive files. You can password protect folder Mac without Disk Utility using compression.
Here’s how to do it step-by-step:
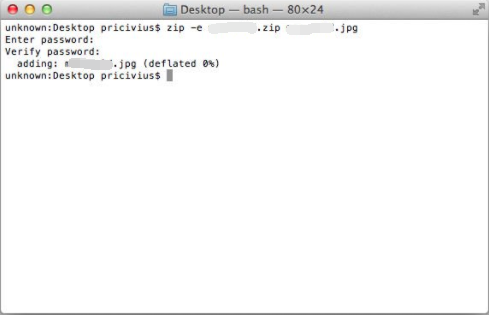
- Launch Terminal. First, you have to open Terminal and go to the place where the file or folder you want to protect is located. For instance, if it is on desktop, you can type in “cd desktop”.
- Finish Confirmation And Enter Proper Command. Now, you have to confirm. After that, you should enter the following command without the quotes and period in it: “zip -e photo.zip photo.jpg”. of course, you have to change “Photo.JPG” to that of the file or folder you went to convert to a ZIP file.
- Provide Your Password And Confirm. Put in a password that’s really strong so that no other person can access it. After that, repeat the password to make sure you confirm it.
- Wait For ZIP File To Display. After that, you should wait for the ZIP file to be displayed in the folder you went through earlier.
As you can see, this method is very easy to implement. It’s like taking candy from a baby. In this case, you don’t have to think about other people who are going to access your files. It still works even if you use the files and send them to another person. They won’t be able to open it if they don’t have the password to it.
Here’s a bonus tip: If you’re not sure about how to password protect folder Mac without Disk Utility, you can opt to actually prevent the files from being displayed by Spotlight search. Here’s how to do it. In the folder name, add the “.noindex” at the end. So, if the folder is called “Ember”, put it as “Ember.noindex”. Got it?
Part 4. Conclusion
Now, we have shown you how to password protect folder Mac without Disk Utility. You can actually do so. Disk Utility can be used as well. Other tools you can use include Terminal and its OpenSSL. You can even protect ZIP files using compression and then add a password to it.
After that, the best way to implement a password protect folder Mac without Disk Utility is through iMyMac PowerMyMac and its Toolkit module. This module has a submodule called Hide. This allows you to encrypt and hide files as you wish. After that, you can simply put a password so that no one can access your files. Easy, peasy! Grab iMyMac PowerMyMac now to protect sensitive files, folders, and data!

